Table of Contents
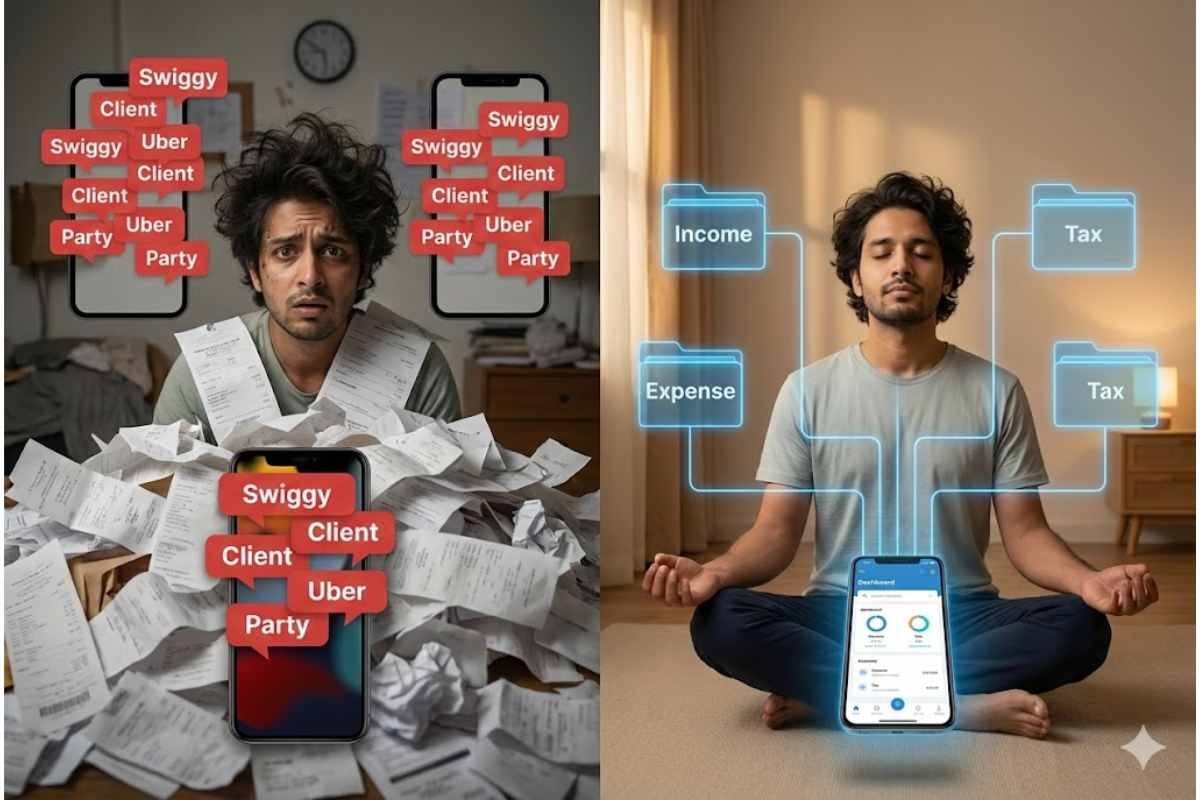
There is a specific kind of anxiety that plagues the Indian freelancer. It usually hits around mid-March. You are sitting in a coffee shop, enjoying the freedom of the gig economy, when a notification pops up: “Income Tax Filing Deadline Approaching.”
Suddenly, the freedom tastes like ash.
You look at your bank statement, and it is a disaster zone. A ₹20,000 client payment is sandwiched between a ₹150 Swiggy order and a ₹40 auto ride. A reimbursement for a flight ticket is buried under a pile of weekend party splits. Your financial life is a khichdi—a delicious mess for living, but a poisonous one for auditing.
In the old days, a Munshi-ji (traditional accountant) would sit with a red bahi-khata (ledger) and meticulously record every rupee. Today, you are the CEO, the intern, and the Munshi. And your tool is not a red book, but the Unified Payments Interface (UPI). While UPI has made getting paid easier than ever, it has made tracking that money a nightmare of digital clutter. But fear not. With a little bit of Artha (wealth management wisdom) and a lot of modern hustle, you can turn your UPI app into a powerful accounting tool. Here is your 8-step Tax Survival Kit to tracking income and expenses without hiring an expensive CA.
The Philosophy: Treat Your Phone Like a Ledger
The root cause of freelance tax panic is “Data Mixing.” When your business money and your golgappa money live in the same stream, you cannot see the truth of your finances. The goal of this kit is to impose order on chaos using the features already built into your payment apps.
1. The Digital ‘Lakshman Rekha’ (The Two-Account Rule)
This is the non-negotiable foundation. You cannot track income if it is mixed with expenses.
The Strategy: You need two bank accounts.
- Account A (The Business Vault): This is strictly for incoming client payments and essential business expenses (software subscriptions, equipment). Link this to a specific UPI ID (e.g., yourname.work@upi).
- Account B (The Personal Wallet): This is for your lifestyle—rent, food, movies. Link this to a different UPI ID (e.g., yourname.personal@upi).
The Action: Never give clients the UPI ID for Account B. Never buy groceries with Account A. By creating this digital Lakshman Rekha, your bank statement for Account A automatically becomes a clean Profit & Loss statement. You have essentially done 90% of your accountant’s job just by separating the streams.
2. The ‘Note’ Discipline (Narration is King)
Most freelancers leave the “Remarks” or “Note” field blank when making or receiving payments. This is a fatal error. A blank transaction is a mystery that will haunt you during tax season.
The Strategy: Treat the note field as your ledger entry.
The Action:
- Incoming: Ask clients to write the project name in the note. If they don’t, you must log it immediately elsewhere.
- Outgoing: If you are paying for a business lunch or a coworking space, type: “Business Exp – Client Meeting” or “Office Rent – March.”
The Result: When you download your statement later, you can simply search for the keyword “Business” to find all your tax-deductible expenses instantly.
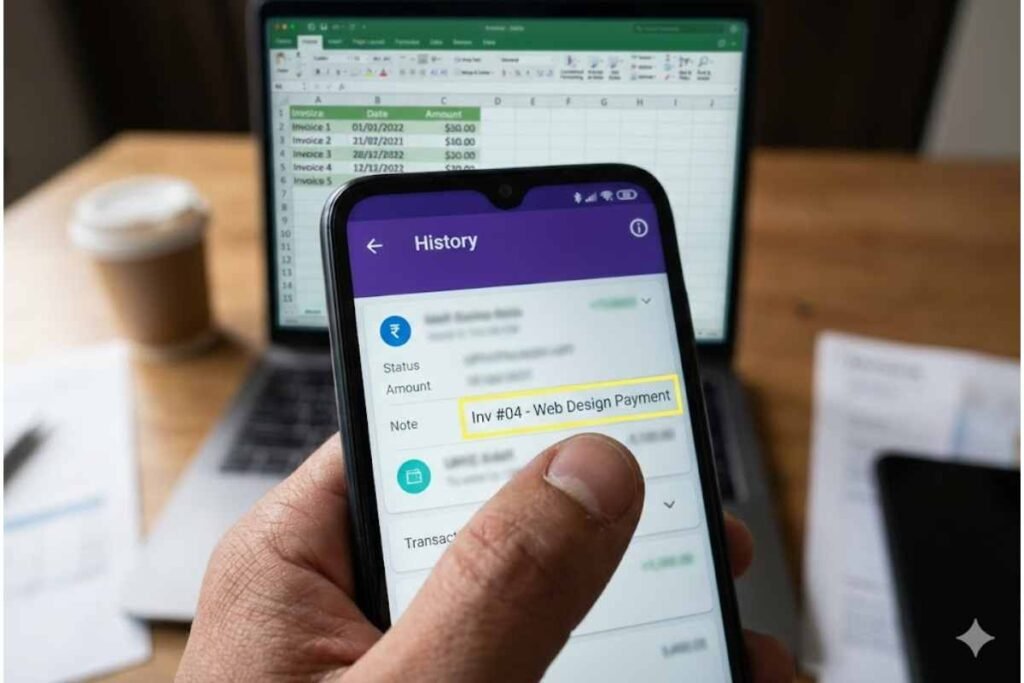
3. The ‘Request Money’ Invoice
Freelancers often chase payments with awkward WhatsApp messages. UPI offers a more professional, trackable alternative.
The Strategy: Use the “Request Money” or “Collect Request” feature as a soft invoice.
The Action: When a project is done, send a formal UPI collect request to the client. In the note section of the request, write: “Invoice #001 – Logo Design.”
The Result: When the client approves and pays, that specific transaction is permanently linked to that invoice number in your digital history. It creates an undeniable digital paper trail that proves the income source.
4. The ‘Business Tag’ (Smart App Features)
Modern UPI apps (like Cred, PhonePe, or Paytm) allow you to tag transactions. Most people ignore this.
The Strategy: Gamify your categorization.
The Action: Spend 10 minutes every Sunday night doing a “Tag Review.” Open your app, scroll through the week’s transactions, and tag them. Most apps have preset tags like “Food,” “Travel,” “Shopping.” Create or mentally designate a tag for “Work.”
The Result: At the end of the year, the app gives you a pie chart. You can instantly see: “I spent ₹50,000 on travel.” You then check if that travel was for work (tax-deductible) or leisure.
5. The Screenshot Folder (The Digital Shoebox)
In the old days, we kept receipts in a shoebox. Today, we need a digital equivalent.
The Strategy: Evidence preservation.
The Action: Every time you make a tax-deductible purchase via UPI (e.g., buying a laptop, paying for a domain name, taking a client to lunch), take a screenshot of the “Payment Successful” screen.
The Fix: Don’t let these rot in your gallery. Create a Google Photos or Drive folder named “FY 2024-25 Expenses.” Upload the screenshot immediately. If the taxman ever asks for proof of expenses, you just share the link to the folder.
6. The ‘Self-Salary’ Transfer
Freelancers often suffer from the “Rich Month, Poor Month” cycle because they spend money as soon as it comes in.
The Strategy: Mimic a corporate structure.
The Action: When a client pays ₹50,000 into Account A (Business), do not spend it directly. Instead, transfer a fixed “salary” (say, ₹30,000) via UPI to Account B (Personal).
The Result: The transaction record in Account A will show “Transfer to Self.” This clearly demarcates your business profit from your personal income. It helps you calculate exactly how much your business is making versus how much you are spending on your lifestyle.
7. The CSV Export Hack (The DIY Audit)
You don’t need accounting software; you need Excel and your UPI data.
The Strategy: The monthly data dump.
The Action: Most banking and UPI apps allow you to “Download Statement” in Excel or CSV format. Do this on the 1st of every month.
The Result: Open the sheet. Use the “Filter” function.
- Filter by “Credit” (Money In) = Total Revenue.
- Filter by “Debit” (Money Out) = Total Expenses.
- Filter notes by “Business” = Tax Deductible Amount.
Doing this 12 times a year takes 15 minutes each time. Doing it once in March takes 3 days of panic.
8. The ‘Internet & Chai’ Split
A major headache for freelancers is mixed expenses. You use your home internet for work and Netflix. You drink chai while working.
The Strategy: The Proportional UPI Payment.
The Action: If your internet bill is ₹1,000, pay it from Account A (Business). If your electricity is ₹3,000, pay it from Account B (Personal).
The Logic: Instead of trying to calculate 40% of every bill, allocate entire categories to business or personal. Pay the broadband strictly from the business UPI ID. Pay the groceries strictly from the personal one. It keeps the audit trail clean and defensible.
Conclusion: Be Your Own Munshi
The gig economy offers the freedom of a bird, but taxes demand the discipline of an elephant. By using these UPI strategies, you are essentially building a real-time, automated accounting system. You are turning the “beep” of a transaction from a fleeting sound into a permanent record.
Remember, the Income Tax Department doesn’t care about your creativity; they care about your clarity. With this survival kit, you can offer them clarity without sacrificing your sanity or your savings to a CA. You are the master of your craft; now be the master of your coin.
Call to Action:
Are you a freelancer drowning in a sea of unorganized transactions? Which of these steps are you going to implement today? Share your tax horror stories (or victory laps) in the comments below. Forward this survival kit to your freelancer friends—they will owe you a coffee (which you can tag as a business expense!). Follow IndiLogs for more hacks on mastering the Indian hustle.